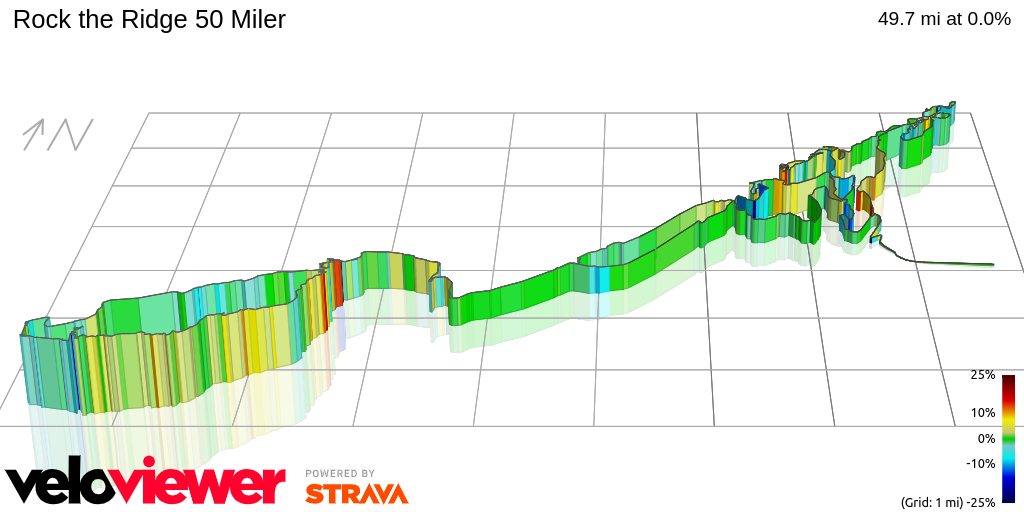
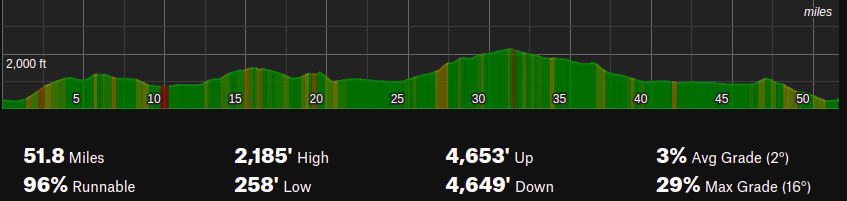
Skip to content

Rock_the_Ridge-50_Miler

Table of Contents

Race Strategy

DistanceRHRFlatHillDownhillHR-AverageNutrition
WU – 00.01140GEL, water as needed
00.0 – 13.0165135 – 145145 – 165120 – 140130 – 140GELs, water as needed
13.0 – 26.3165135 – 145145 – 165120 – 140140 – 155GELs, water as needed
26.3 – 39.0175140 – 160155 – 175120 – 165140 – 155GELs, water as needed
39.0 – 50.0185150 – 170145 – 185120 – 175145 – 155GELs, water as needed

Morning Nutrition Strategy

Pre - Race Strategy
6:00 Race - Starts
  • 2:00 am | Heavy Breakfast
  • 4:00 am | Light Breakfast
  • 5:20 am | UltraL Breakfast
  • 5:45 am | Start race Nutrition

Nutrition Plan
1. If the race starts at 6:00 am, your heaviest breakfast should be at least 3 ½ to 4 hours before. So if the race starts at 6:00 am, you should wake up at 2:00 or 2:30 am and eat your heaviest breakfast. For instance, I usually eat some oatmeal with bananas, nuts, and berries. Sometimes coffee and eggs.

WHY? Because this will allow you enough time to digest that food and use the bathroom before the race starts. Ideally, before you leave the hotel. So, you have less bathroom anxiety once in the race venue. You can go back to bed to sleep or relax until the second part of the plan.

2- Around 4 am to 4:30, you can eat your light breakfast. In my case, I usually eat a banana and a Gatorade. Some people get a peanut butter and jelly sandwich. The goal behind this is just a nice set of extra carbs that you can digest easily and that are not heavy in your stomach.

3- Around 5:00 am to 5:15 am, ½ Gatorade and ½ banana if you are hungry

4- If the race starts at 6:00 am, you should start your first round of nutrition 15 min before you get in the water. For instance, 1 SIS gel, a bit of water, or your first round of Infinit.

Heavy Breakfast

Oatmeal, eggs, banana, fruit, nuts

Light Breakfast

Gatorade and banana

UltraLight Breakfast

½ Gatorade and ½ banana

Start race nutrition

1 gel

Notes

  • Please follow the HR strategy.
  • Fight the urge to keep up with people starting faster than you.
  • If you feel you are holding is a good sign. Keep discipline because that additional energy will be needed later.
  • Concentrate on your HR 
  • Focus on navigation. Getting off course means running slower in the overall picture
  • Try to relax and have positive pictures of how the day is going to go. It is super important to do this. It is one way to get rid of nerves before going to the start.
  • If cold, Ideally warm up with Warm clothes and switch into racing clothes before getting to the corral if possible

Warm-up

  • Warm-up 10 min easy just to get moving. (wear warm clothes if possible).
  • Ideally HR < 130
  • Get your first pre-nutrition gel slowly during the warm-up

Miles 0.0 - 13.0 miles

HR-Strategy
165 RHR
  • Flat: 135-145
  • Hill: 145-165
  • Downhill: 120-140

Leg 1: Testimonial Gateway/Eagle Cliff/Pine Road

  • Distance: 13 Miles
  • HR Strategy: Z1-3
  • Elevation Gain: +1,396 ft
  • Elevation Loss: -1,283 ft
  • Aid-Station: 2.4, 4.6, 7, 9.1, 10.3, 13
  • Toilets: 4.6, 13

Miles 13 - 26.3 miles

HR-Strategy
165 RHR
  • Flat: 135-145
  • Hill: 145-165
  • Downhill: 120-140

Leg 2: Pine Road/Skytop/Slingerland Pavilion

  • Distance: 13.3 Miles
  • HR Strategy: Z1-3
  • Elevation Gain: +1,558 ft
  • Elevation Loss: -1,281 ft
  • Aid-Station: 15.58, 19.8, 22.3, 26.3 
  • Toilets: 26.3

Miles 26.3 - 39 miles

HR-Strategy
175 RHR
  • Flat: 140 -160
  • Hill: 155 - 175
  • Downhill: 120-165

Leg 3: Spring Farm/Old Minnewaska/Lyons Road

  • Section Length:  12.7 miles
  • HR Strategy: Z1-4
  • Elevation Gain: +1,371 ft
  • Elevation Loss: -940 ft
  • Aid-Station: 30.01, 34.1, 39 
  • Toilets: 34.1, 36.33, 39

Miles 39 - 50 miles

HR-Strategy
185 RHR
  • Flat: 150-170
  • Hill: 145-185
  • Downhill: 120-175

Leg 4: Lyons Road/Overcliff/Testimonial Gateway

  • Section Length:  10.9 miles
  • HR Strategy: Z1-4
  • Elevation Gain: +296 ft
  • Elevation Loss: -1,118 ft
  • Aid-Station: 43.7, 50 
  • Toilets: 41.35, 43.7, 47.48, 50

Map: Terrain Leg 1

Map: Terrain Leg 2

Map: Terrain Leg 3

Map: Terrain Leg 4